Digger - PS3 - Convert
This is a quick blog to explain some work I've done to convert a remote-controlled digger to use a Pi Zero, Dark Water 640, PS3 controller and a few other odds and ends to make a SUPER DIGGER!
https://www.rcsparks.com/forum/threads/bruder-man-truck-rc-conversion-w-embedded-pc.36711/
However, I came across some fairly inexpensive remote-controlled construction toys and I thought I might give them a try. For example:
HuiNa Toys 1550 15Channel 2.4G 1/12RC Metal Excavator
Note: This is just one example, they can be found in many places. The one I'm demonstrating is a 1:12 scale.
They have a 640 board ( 6(motors) 4(for) 0(Pi Zero)). Perfect!
import time
from darkwater_640 import dw_Controller, dw_Motor
dw = dw_Controller( addr=0x60 )
m1 = dw.getMotor(1)
m1.off()
print 'Motors initilized'
time.sleep(1)
print 'Move motor 1 for +100 for 1 second'
m1.setMotorSpeed(100)
time.sleep(1)
m1.setMotorSpeed(0)
time.sleep(1)
print 'Move motor 1 for -100 for 1 second'
m1.setMotorSpeed(-200)
time.sleep(1)
print 'done'
m1.off()
To know what GPIO pins are available, look at the 640 docs.
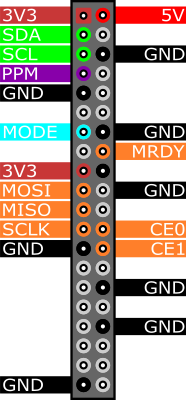 The GPIO pins which are grey in colour are available for use.
I used GPIO 17 for the tail lights, 22 for the headlight and 16 for the top yellow light.
Two of the wires are simple, brown is ground and red is vcc(+5v). The yellow line is the signal line. To get the LED to change modes, you "turn the servo" all the way clockwise and then back to counter clockwise (anti-clockwise). So I added this code to use the X button on the controller.
Here is a closeup of the plug in the Darkwater board.

I did a lot of research on how to add sound and music to the project. I never found a solution I really liked, but this USB device seemed like a good option even if it added quite a bit to my BOM.
https://core-electronics.com.au/mini-external-usb-stereo-speaker.html
 I didn't want to add a USB to USB-Micro plug converter, so I rewired the USB plug and made is slim to fit better on the Pi Zero.
Here is the initial prototype of the sound.
Commands are all speed/time based. There are no sensors to know exactly the position of any given item.
Examples:
curl -X POST http://diggerIp:5000/mainarm/down/100/2000
curl -X POST http://diggerIp:5000/mainarm/up/200/2000
curl -X POST http://diggerIp:5000/move/forward/200/1000
curl -X POST http://diggerIp:5000/move/backward/200/1000
curl -X POST http://localhost:5000/smallarm/up/100/1000
curl -X POST http://localhost:5000/smallarm/down/100/1000
curl -X POST http://localhost:5000/rotate/right/50/1000
curl -X POST http://localhost:5000/rotate/left/50/1000
curl -X POST http://localhost:5000/bucket/up/50/1000
curl -X POST http://localhost:5000/bucket/50/100/1000
curl -X POST http://localhost:5000/turn/left/200/1000
curl -X POST http://localhost:5000/turn/left/200/1000
https://github.com/gravesjohnr/RemoteControlDigger
This contains the code as well as a PiZero image.
Intro
My five-year-old son loves to play with construction toys. I've purchased several Bruder brand trucks and they are great! I envisioned someday modifying them to be remote-controlled. There are many blogs on the subject. For example:https://www.rcsparks.com/forum/threads/bruder-man-truck-rc-conversion-w-embedded-pc.36711/
However, I came across some fairly inexpensive remote-controlled construction toys and I thought I might give them a try. For example:
HuiNa Toys 1550 15Channel 2.4G 1/12RC Metal Excavator
Note: This is just one example, they can be found in many places. The one I'm demonstrating is a 1:12 scale.
Bill of Materials
- 1550 Digger
- Pi Zero
- Darkwater 640 motor controller
- pololu 5v step-up/step-down voltage regulator s7v7f5
- LEDs (Optional)
- Camera (Optional)
- Mini External USB Stereo Speaker (Optional)
- GPIO Hammer (Optional)
- CSI/DSI Cable Extender (Optional)
- AUSTAR LED Light Warning/Ambulance (Optional)
Motor Controller
I knew I wanted to use the Pi Zero. I played around with some Arduino devices, but I like having the full control a Pi gives. And, the price of the Zero is great! But, I needed a reasonably priced motor controller to handle all six motors on the digger. Fortunately I found the Dark Water company in the U.K.They have a 640 board ( 6(motors) 4(for) 0(Pi Zero)). Perfect!
Original Device
The original device had a simple computer board with wires to each motor. It was quite easy to map these to the Dark Water 640 controller.Wiring up the Dark Water Board
Wiring up the darkwater board was quite simple. The existing device had 6 motors and the 640 allows for six motors. Easy!7.2v Battery - 5v Pi Power
The digger has a 7.2 volt battery pack and I wanted to avoid having a second 5 volt battery for the Pi. The folks at core-electronics recommended a nice power regulator; which works quite nicely.Testing the Motors
PS3 Pairing
You will only need to do this pairing once, unless the controller is paired to another device. You have to connect the PS3 to the Pi to setup the PS3 controller to trust the Pi. This uses a program called sixpair. You then need to setup the Pi to trust the PS3 device. This is done using the bluetoothctl program.PS3 Controller Software
In the darkwater_python_640 directory there is the main software to run the digger. It is called digger-ps3.py. I've setup the Pi to run this on boot using systemctl scripts, but it is important to note that the PS3 controller should be on and searching when the Pi boots. Otherwise the software will fail to find the controller and turn itself off.LEDs
The LEDs were pretty easy to setup. There are lots of blogs on running LEDs from a Pi Zero, so I won't go into detail here. The code in the image has some samples.To know what GPIO pins are available, look at the 640 docs.
I used GPIO 17 for the tail lights, 22 for the headlight and 16 for the top yellow light.
AUSTAR LED Light
The light on top of the cab I wanted to be a bit special. I found an interesting LED on banggood and I thought I'd give it a try. The videos looked nice, but I couldn't find any wiring diagrams. As it turns out, it uses wires typically used for servos. PERFECT! The Darkwater board supports two servos. So, I just plugged it in and played around with the numbers until I got it to work.Two of the wires are simple, brown is ground and red is vcc(+5v). The yellow line is the signal line. To get the LED to change modes, you "turn the servo" all the way clockwise and then back to counter clockwise (anti-clockwise). So I added this code to use the X button on the controller.
Here is a closeup of the plug in the Darkwater board.

Sound/Music
I did a lot of research on how to add sound and music to the project. I never found a solution I really liked, but this USB device seemed like a good option even if it added quite a bit to my BOM.
https://core-electronics.com.au/mini-external-usb-stereo-speaker.html
Here is the initial prototype of the sound.
Camera
Just for fun, I decided to add a camera to the digger's cab. There were a couple of issues.- The cable used on the Pi Zero is smaller than the standard camera cable and most converter cables are pretty short. But I found an CSI/DSI Cable Extender which allowed me to use a longer cable. This also helped me have a clean place to disconnect the camera when I wanted to remove the cab from the digger.
- I wanted to have live video, but not take up too many resources on the PiZero. I found MJPG-Streamer and it works great.
- After testing, it isn't possible to run the digger in first-person mode. I think a wide-angle camera would be needed. However, it is still pretty cool having the camera.
- The camera ribbon cable on the PiZero comes out pretty easily. I had to be very careful to make sure the cable wasn't getting pulled on when putting it all together.
Rest Enabled
For my day job, I work for Oracle. So, it seemed natural to see how I might enable services on this digger to be called remotely. In the /home/pi/darkwater_python_640 directory, I have a digger-rest.py script. This exposes all the digger capabilities as REST services. What I might do with this is yet to be determined, but it is pretty fun to control the digger using CURL commands!Commands are all speed/time based. There are no sensors to know exactly the position of any given item.
Examples:
curl -X POST http://diggerIp:5000/mainarm/down/100/2000
curl -X POST http://diggerIp:5000/mainarm/up/200/2000
curl -X POST http://diggerIp:5000/move/forward/200/1000
curl -X POST http://diggerIp:5000/move/backward/200/1000
curl -X POST http://localhost:5000/smallarm/up/100/1000
curl -X POST http://localhost:5000/smallarm/down/100/1000
curl -X POST http://localhost:5000/rotate/right/50/1000
curl -X POST http://localhost:5000/rotate/left/50/1000
curl -X POST http://localhost:5000/bucket/up/50/1000
curl -X POST http://localhost:5000/bucket/50/100/1000
curl -X POST http://localhost:5000/turn/left/200/1000
curl -X POST http://localhost:5000/turn/left/200/1000
Final Test
I put it all back together and had my six-year-old son give it a test. I think it was a great success.Software
The code can be found here:https://github.com/gravesjohnr/RemoteControlDigger
This contains the code as well as a PiZero image.
hp officejet pro 9015 usb connect
ReplyDeletehp officejet pro 9015 printer manual
hp officejet pro 9015 driver
Very interesting , good job and thanks for sharing such a good blog, for know more related to hp printer setup 123.hp.com/setup
ReplyDeletemergers & acquisitions
ReplyDeleterecent m&a deals